

CLM Signer Configuration
Business Background
Send contracts to single or multiple signatories for their approval.
Titan Solution
- Configuring signers is dynamic in Titan CLM.
- Participants can be added or removed at any stage of the CLM journey.
- Use Titan CLM to configure the designated signers for a document in a few clicks.
How to Guide
Signers are people who must sign the document.
- Under Document, select the Settings option.
- Expand the Document Access option.
- Click the Add signer option.

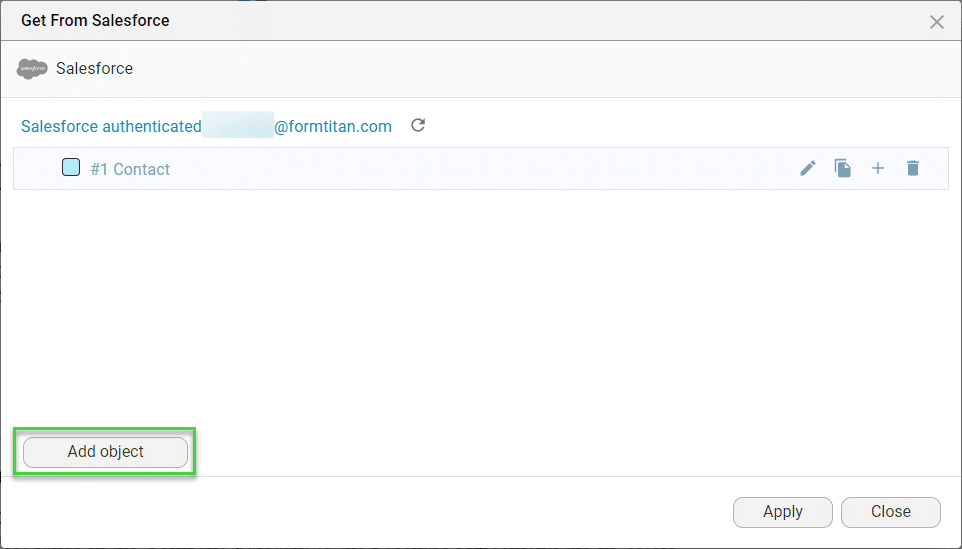
- Type the signer’s name in the Name field and click the Configure button. The Get From Salesforce screen opens.

- Click the Add object button to open the Map Salesforce fields screen.
- Select the object from the drop-down list. This is the object that contains the signer’s contact details. The Conditions drop-down list is added to the screen.
- Expand the Conditions (Not Set) drop-down list.
- Click the Set Conditions button to open the Conditions for Salesforce screen.

- Select the conditions that will filter your signer.
- Click the Apply button. The Conditions for Salesforce screen closes and the status of the Conditions has changed to Is Set.

- Expand the Map fields (Not Set) drop-down list.
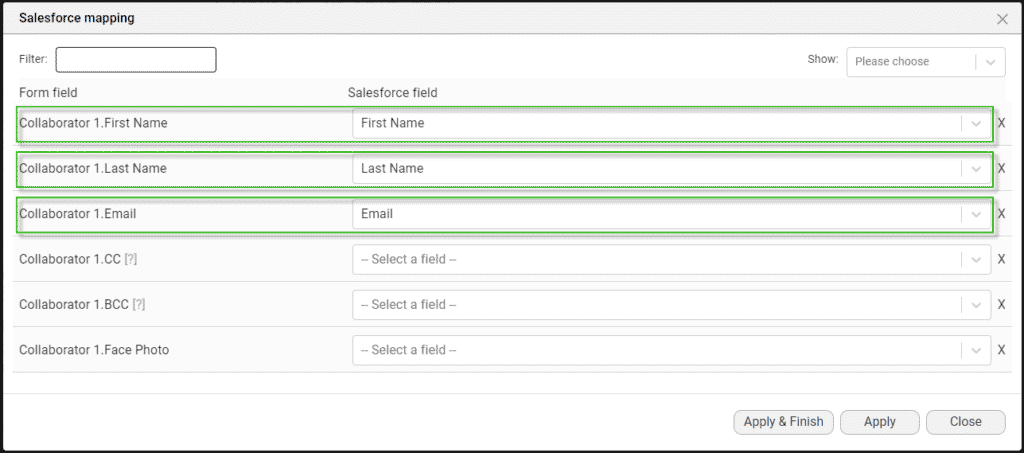
- Click the Set Mapping button to open the Salesforce mapping screen.

- Select the First Name, Last Name, and Email from the Salesforce field drop-down lists, and click the Apply and Finish button. The Salesforce mapping and the Map Salesforce fields screens close.
- Repeat the steps until you have added all the signers you need.
Note:
Each signer is assigned a unique color. This color will be used when you drag any elements to the document for this signer. The element’s color will correspond with the signer’s color.
- Use the arrow buttons to change the order of the signers if necessary.

- Click the Signer Type checkbox. The Configure button is added.
- Click the Configure button to open the Configure signers screen.

- Select the Signers type by choosing a radio button:
- Signer – this person must sign the document. A copy of the signed document will be sent at the end of the process.
- Reviewer – this person will receive a copy of the document to review and will not receive a copy of the signed document.
- CC – this person will receive a copy of the signed document.
- Click the Apply button.

Remember to assign interactive fields to a signer.
Watch the video on how to add CC and BCC fields in Titan Sign. The CC and BCC fields are the same for Titan CLM.
Hidden Title
Was this information helpful?
Let us know so we can improve!
Need more help?
Book Demo