

Collaborator Type
Business Background
Collaboration is dynamic. There are different collaborator types that can be assigned.
Titan Solution
Use one of the following options to change the collaborator type during the collaboration process:
- Titan CLM project
- Web page during the online collaboration
How to Video
Coming Soon.
How to Guide
Prerequisite:
Collaborators can edit the contents of a document or can add comments before the signing process starts.
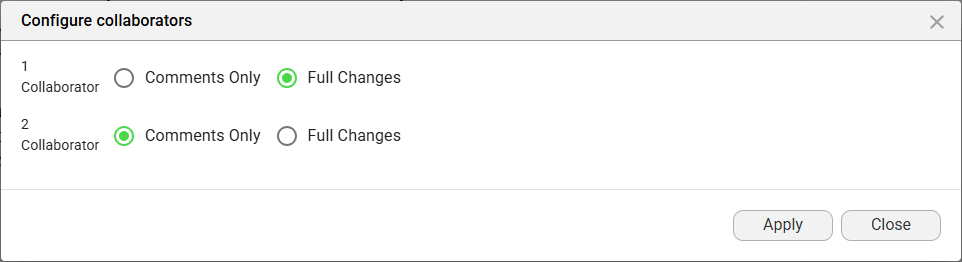
- Collaborators can have a Full Changes type that allows them to edit the document using various options, such as deleting or adding text, changing colors, or adding images or tables.
- Collaborators can have a Comments Only type that will allow them to add comments on the document but not edit it.
- A collaborator with Full Change type will receive an email with the following subject line: “You are invited to collaborate on a document” unless the text was changed using the Titan CLM project builder or the Titan CLM wizard in Salesforce.
- A collaborator with Comments Only type will receive an email with the following subject line: “You are invited to comment on a document” unless the text was changed using the Titan CLM project builder or the Titan CLM wizard in Salesforce.
The Collaborator Type screen changes according to the definition of the Owner (Current Salesforce user / Configure in Collaborators)
Current Salesforce User
- Under CLM on the Titan CLM project, click on the Current Salesforce user radio button. (This is the default option.)
- Click on the Collaborator Type button. The Configure Collaborators screen opens.
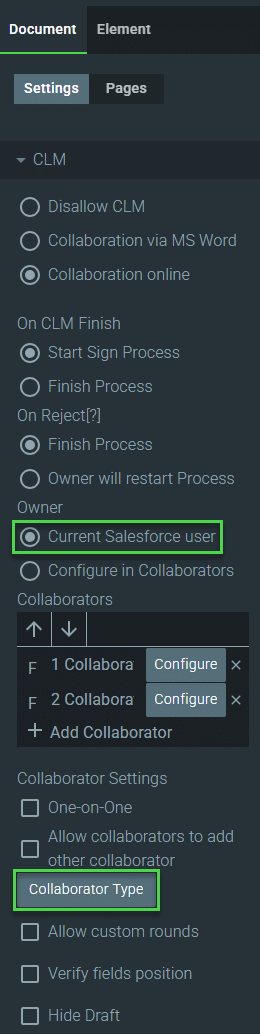
- Click on a radio button to assign a type to a collaborator.
- Click on the Apply button.
- Save the project.
Configure in Collaborators
- Under CLM on the Titan CLM project, click in the Configure in Collaborators user radio button.
- Click on the Collaborator Type button. The Configure Collaborators screen opens.
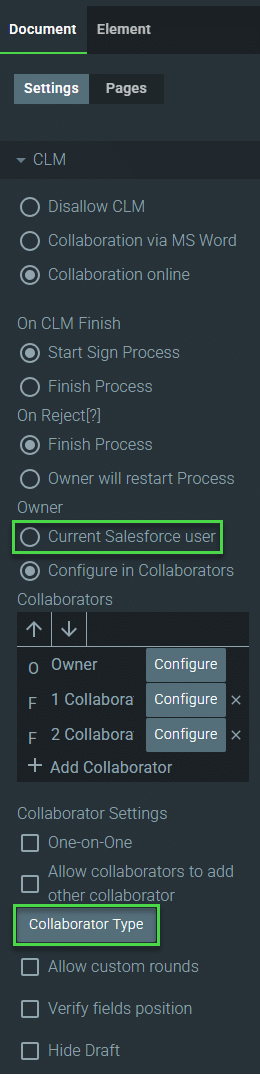
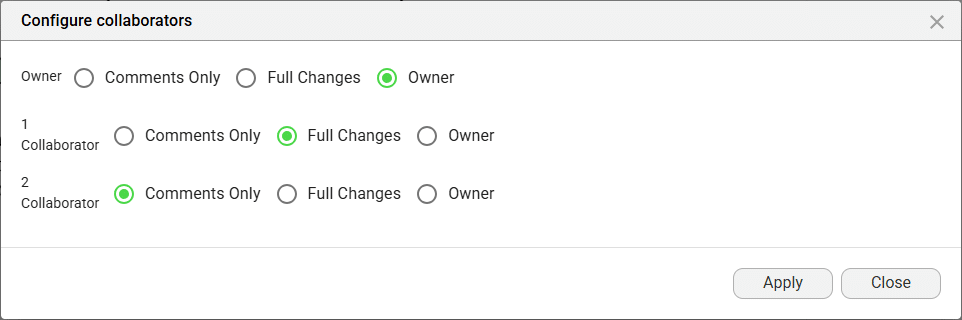
You can select which collaborator must be the owner on this screen. Only one collaborator can be an owner and there must be at least one owner.
- Click on a radio button to assign a type to a collaborator.
- Click on the Apply button.
- Save the project.
Change All Type on the Document
This collaborator can use all the options on the document toolbar as well as the formatting tools on the right of the screen.
- Use the options in the toolbar to make changes. For instance, you can do the following:
- Insert an image: Upload an image from the computer
- Insert a table: use the Insert Table wizard to specify the number of columns and rows and insert a table.
- Add a link: Use the Insert Hyperlink wizard to insert a hyperlink that can also be used as a bookmark.
- Add a bookmark: use the Bookmark wizard to insert a bookmark.
- Add comments: use the Comments field to add and save a comment.
- Click here for more information on online collaboration.
- Click on the Save button to save the changes. There are messages: “Sending your document, please wait” and “Thank you for reviewing the document.”

Comments Only on the Document
This collaborator can only use the Comments option on the document toolbar. All the other toolbar options and the formatting options on the right of the screen are disabled.
The document has an active Comments option on the toolbar and a Comments tab where comments are showed.
- Click on the Comments option on the toolbar to add a comment. A comment field is added.
- Type the comment in the field and click on the Save icon.
- Highlight text with your mouse and right-click with your mouse. A popup opens.
- Click on the New Comment option. A comment field is added.
- Type the comment in the field and click on the Save icon.

A comment can be edited, deleted, replied to, and resolved.

- Click on the Save button to save the document.