

SmartV Login
Business Background
A login screen is an entry page to a web or mobile application that requires a user to supply identification and authentication, which will be verified against existing credentials. Only users who can successfully verify themselves will be granted access to the page.
Titan Solution
- Add a custom login screen using any object in Salesforce with no code.
- A customer will have to log in to the project with unique identifying parameters. The object in Salesforce will be used to authenticate the user.
- Titan lets you add a login page to your project in a few steps. Only users with the required information can log in.
How to Guide
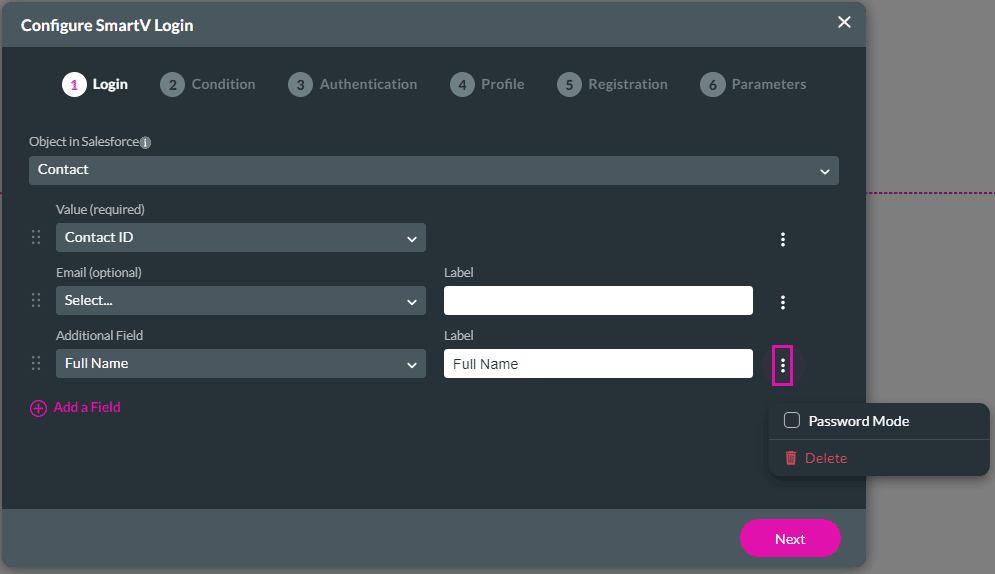
- Use the drop-down list to select the object from Salesforce, such as Contact. This is the object with which you want to authenticate a user in Salesforce.

- Use the drop-down list to select the value, for instance, ContactID. This is usually the ID of the record of the selected object in Salesforce. This is a required field.
- This is the value that is returned after the SmartV was completed successfully.
- It will be stored and you can use it again later, for instance, to do queries.
- Use the drop-down list to select the email. The default option is Email. This is an optional field.

Note:
It is possible to leave the Email field is blank (nothing is selected from the drop-down list) and you can add an additional field:

You can then add an email option on the Authentication screen:

The 2FA will be sent to the user’s email address.
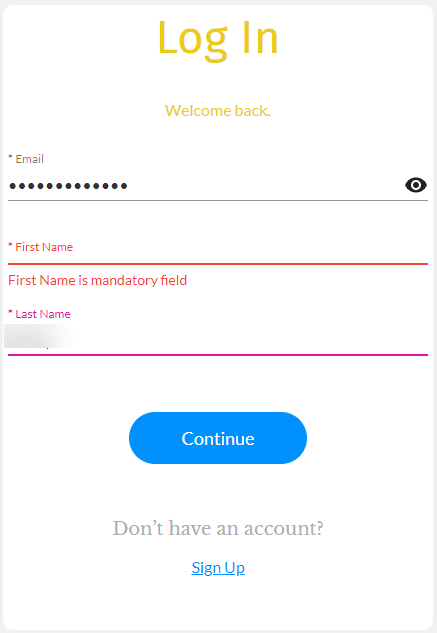
- Click the Add a Field option to add additional fields. There must at least be an email field or an additional field. The more fields you add, the more fields a user will have to complete before gaining access to the page.
- For instance, if you add first name, last name, email address, street address and social security number, the user must complete all these fields before they will be able to log in to the webpage. All these fields will be used to verify the identity of the user.
- Users will see an “Invalid login” message when the information that they supplied cannot be verified. They must supply the correct information for all the fields before they will be logged in.
- If the user selects the log in button without completing all the mandatory fields, a message will be shown underneath each mandatory field that it must be completed.
- If the user uses an email address that is associated with more than one record in Salesforce, the login will fail. Refer to the following video for more information.
- After an invalid login, the user must wait 30 seconds before attempting to log in again.
- The wording of the messages is editable under the Captions option on the Settings screen. Click here for more information.
- Use the drop-down list to select an additional field, such as Full Name. The label added by default is the same as the field, but it is editable.

- To add additional protection, click the Kebab icon to open the pop-up.
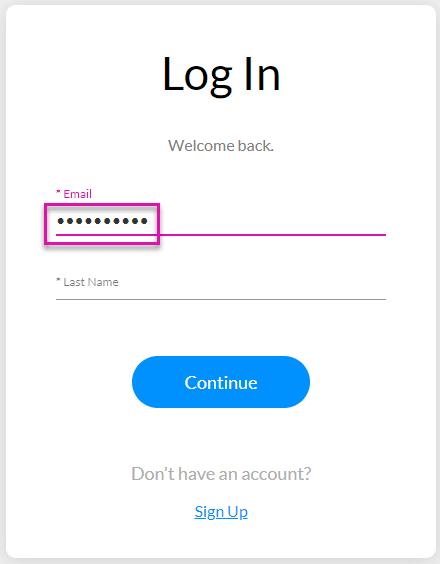
- Click the Password Mode checkbox to add password mode to the field. The user’s input data will be protected.
Note:
When the user completes this field in password mode, only dots will be visible:
- Click the Next button. The Condition screen opens.
Hidden Title
Was this information helpful?
Let us know so we can improve!
Need more help?
Book Demo