

Signer Sections
Business Background
You may need to send a document to an unknown number of signers, for instance, all the contacts linked to an account.
Titan Solution
The Titan Word add-in has a feature where you can add a signer section, configure as many input fields and signatures as you need, and send the document to an unknown number of signers.
This simple setup saves time and effort, and Titan will ensure that all the signers with email addresses receive the document to sign.
Titan gives you the functionality to sort the signers. You can also add conditions that will let you send the document to a specific subset of signers that meet the specified criteria.
- You must configure the document in Titan Sign to easily send the document to multiple signers.
- You can also add conditions that will let you only send the document to certain contacts in the account that meet specific criteria.
How to Video
Coming soon.
How to Guide
Prerequisite:
Create the document in MS Word using the Titan Word add-in.
- Refresh the Titan Dashboard if you don’t see the document you added in MS Word.
- Click on the Sign project to open it.

- Under Settings, click on General to open the list.
- Add a Document Name, if necessary. This name will be shown in the email that the signers receive.

- Under Settings, click on Document Access to open the list.
- Select the Salesforce Configuration button. The Salesforce Configuration screen opens.
- This is a Sign Section document, and the Dynamic radio button is selected by default.
- In this case, it is not possible to select another option.

- Use the drop-down list to select the object.
- Click in the Allow Salesforce Button checkbox.
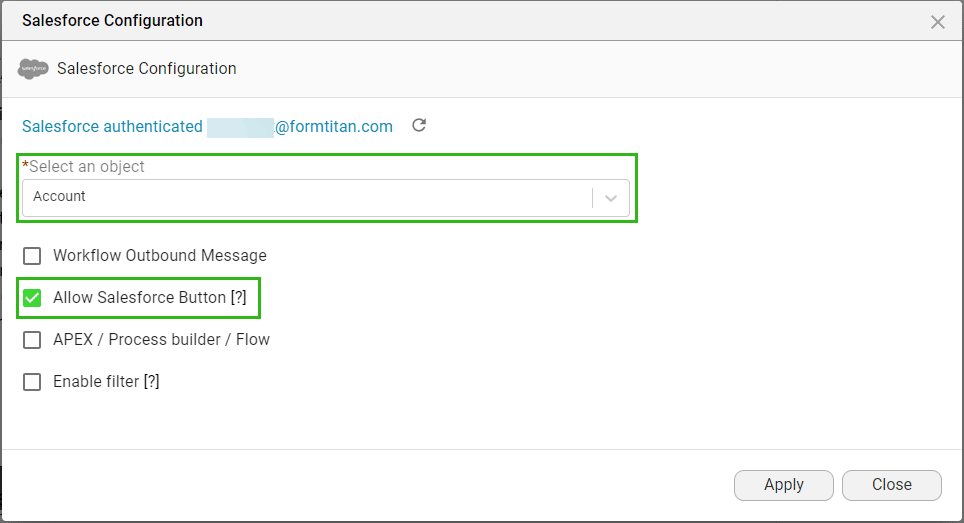
- Allow Salesforce button: When you enable this option, the project will be visible in the projects list if we initiate the process from a button or LWC.
- Button Link (for instance, Opportunity):
- /apex/Form_Builder__TitanSignWizard?recId={!Opportunity.Id}&lang=auto&wizardType=Full
- LWC name:
- CLM (for instance).
- Use the following for the button and LWC:
- WizardType:
- Full (or select one of the following: Sign, CLM, DocGen)
- Language: select one of the following: auto, en (English), he (Hebrew)
- WizardType:
- Button Link (for instance, Opportunity):
- AEPX/Process builder/Flow: Click in this checkbox if you wish to initiate the project from an APEX, Process builder, or Flow.
- Enable filter: Click in this checkbox if you want to add a filter. The project will be relevant to the Salesforce records corresponding to this filter.
- Click on the Apply button.
- Under Settings and General Access, click on the Edit button under the 2-Factor authorization radio button.
- The radio button is selected by default. It is recommended that you use 2FA.
- Click here for more information on how to configure the 2FA.
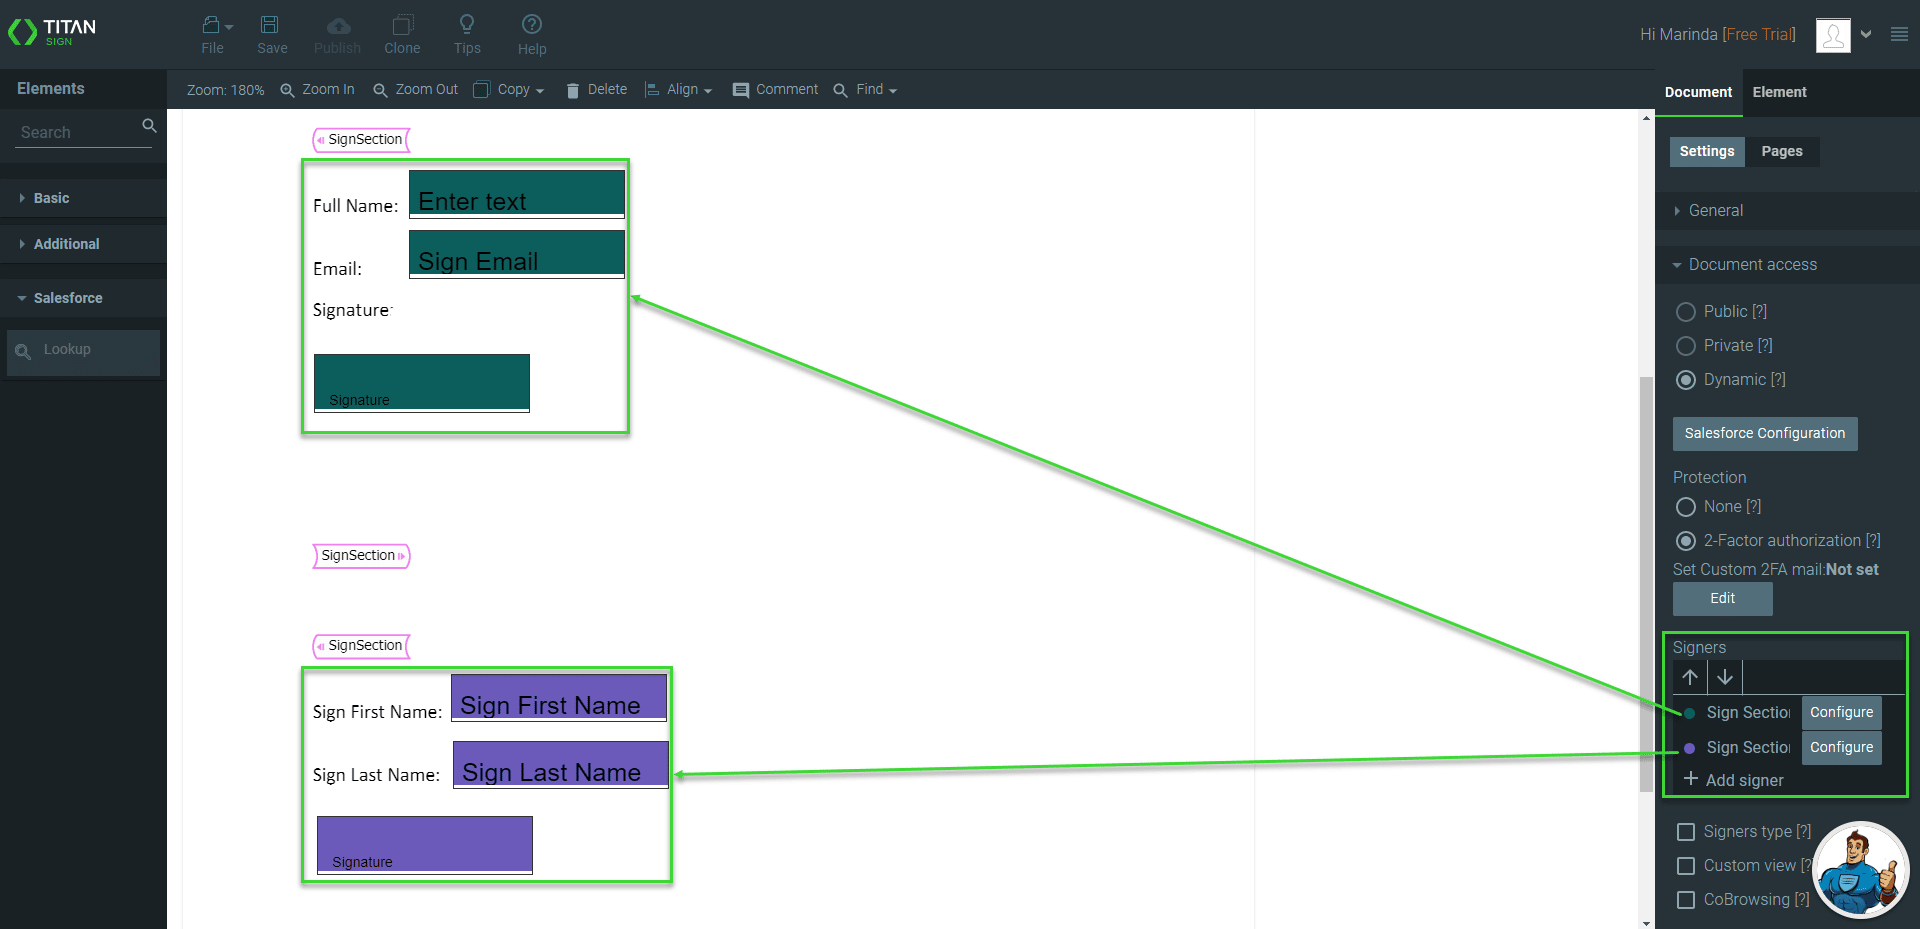
- Click on the Configure button next to Sign Section. The Get From Salesforce screen opens.
Sign Section is added as a signer by default under Signers.
The interactive elements in the document have the same color as the icon next to Sign Section.

- Click on the Add object button. The Map Salesforce fields screen opens.

- Use the drop-down list to select the object.
- Click on the Conditions (Not Set) option.

- Use the radio button to select the All option and click on the Set Conditions button. The Condition for Salesforce screen opens.

- Use the drop-down lists to select the following:
- AccountID Equals RecordID

- If necessary, use the Add new Condition option to add another condition.
- Use the drop-down lists to select other conditions, for instance:
- Email Is not empty
- The document will only be sent to contacts with an email address.
- You can add any conditions that suit your business needs.
- Use the drop-down lists to select other conditions, for instance:
- Click on the Apply button. The screen changes to Conditions (Is Set).
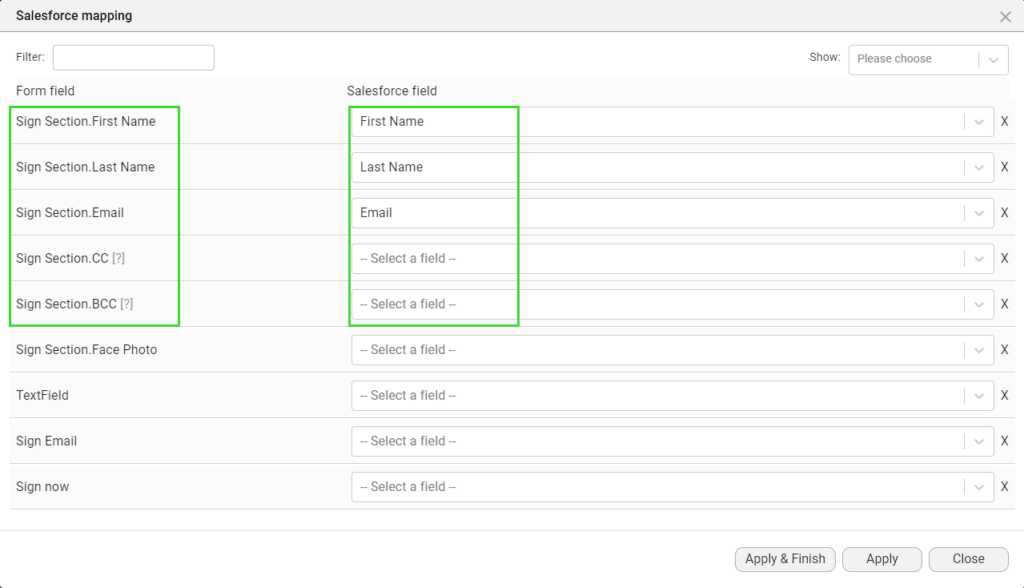
- Click on the Map Fields (Not Set) option.

- Click on the Set Mapping button. The Salesforce mapping screen opens.

- Use the drop-down lists and map the Salesforce fields to the Sign Section Form Fields.
- Click on the Apply & Finish button.
- If necessary, configure a second sign section.
- You can only configure the second sign section if you have added two sign sections in the Word template.
- The interactive elements in a sign section have the same color as the icon next to that specific Sign Section.
- Configure the email that the signers will receive. Click here for more information.
- Click on the Save button to save the project.
- Generate the document in Salesforce.