

Generate Documents in List View
Business Background
Generate a document (or documents) for multiple records once using the list view in Salesforce.
Titan Solution
You can generate a document or multiple documents using the FT Generate Documents Lightning functionality in Salesforce’s list view.
How to Video
Coming soon.
How to Guide
Note:
Prerequisites:
- Create the document in Titan Docs, Titan Sign or Titan CLM.
- Make sure that you have added the FT Generate Documents Lightning button on the Salesforce object list view.
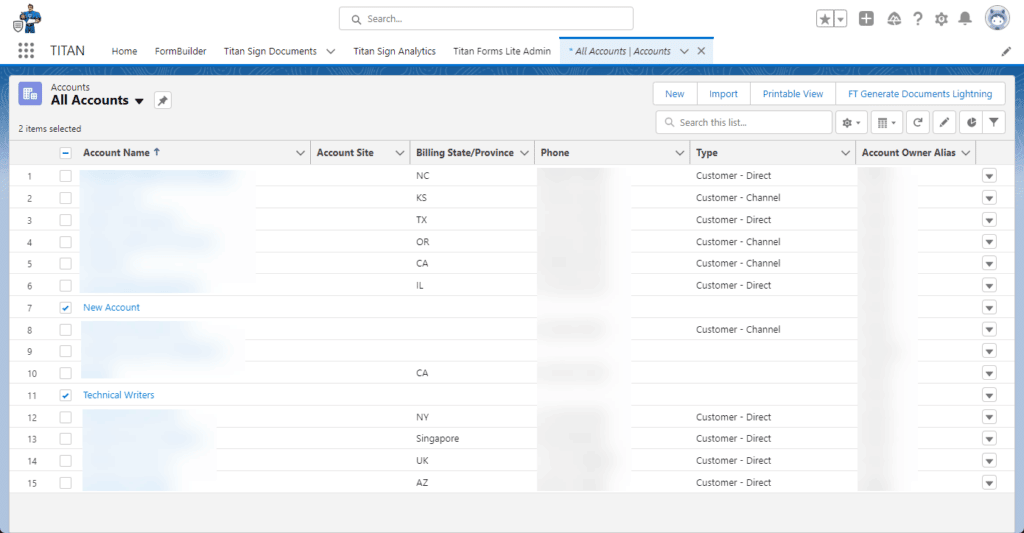
- Open the object in Salesforce from where you want to send the document, for instance, Accounts.
- Make sure that you are viewing the object in list view.
- Select the records that you want to send the document to using the checkboxes. In this example, two accounts have been selected.
- Select the FT Generate Documents Lightning button. The Titan Document Generation screen opens.
- Select the document you want to send to the selected records. You can select multiple documents.

| Option | Description |
|---|---|
| Generate | Select this option to generate the document. You will receive and email confirming the submission. |
| Send via Email | Select this option to send the document via email. Titan uses the Salesforce Lightning session, automatically creates the email template, and sends the email according to the configuration done on the email template. It adds an email activity to the object. |
| Merge | Select this option to merge two or more documents. |
| Download | Select this option to download the document. |
| Preview | Select this option to preview the document. |
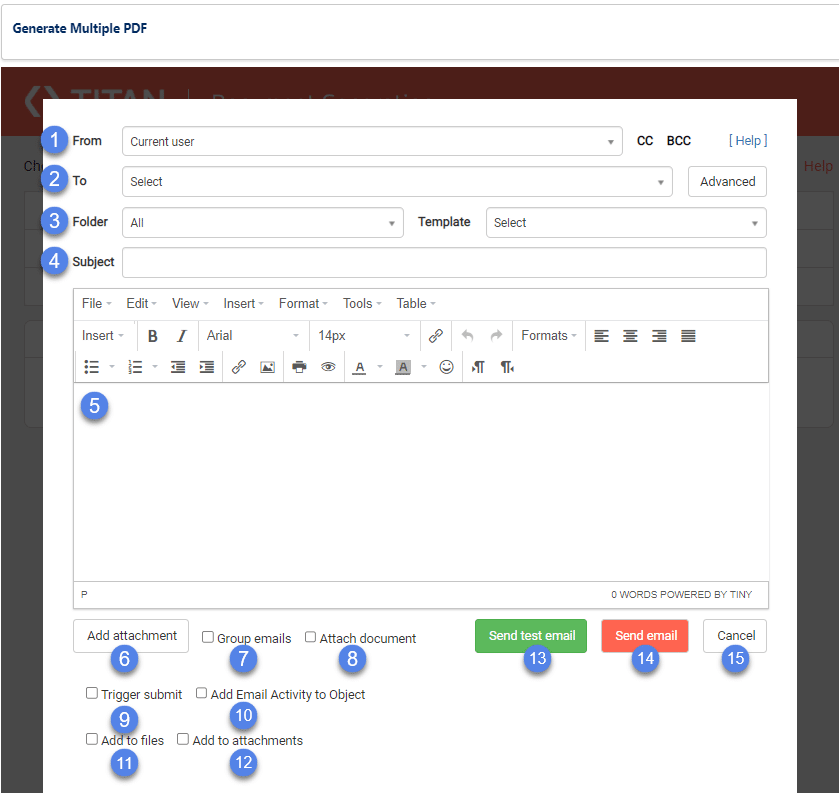
Send via Email
| Number | Option | Description |
|---|---|---|
| 1 | From | Use the drop-down list to select the from address. The default is “Current user.” This field is mandatory. |
| 2 | To | Use the drop-down list to select the to address. This field is mandatory. |
| 3 | Folder and template | Use the drop-down lists to select the the folder and the template. |
| 4 | Subject | Type a subject in the Subject field. This field is mandatory. |
| 5 | Body of the email message | Type a email message in the body and use the Insert drop-down list to add interactive fields, if necessary. |
| 6 | Add Attachment | Type an email message in the body and use the Insert drop-down list to add interactive fields, if necessary. |
| 7 | Group emails | Use this option to send one email for the generated documents (when you are sending multiple documents). Instead of a separate email for each document with its unique URL, the emails will be grouped into one email with the URLs for each document. The recipient will, therefore, only receive a single email with multiple URLs and not multiple emails, each with a single URL. Please note that the option Add Email Activity to Object (10) is no longer shown when the Group emails checkbox is selected. |
| 8 | Attach document | Click this checkbox to attach the document to the email. You could use this instead or in addition to the document’s URL. |
| 9 | Trigger submit | Trigger the actions that you configured on the form in Titan, for instance, push to Salesforce, get from Salesforce, etc. |
| 10 | Add Email Activity to Object | The email activity is added to the object. |
| 11 | Add to files | Add the file to the files related to your record. |
| 12 | Add to attachments | Add an attachment to the Salesforce object. |
| 13 | Send test email | Select this option to send a test email. |
| 14 | Send email | Select this option to send the email. |
Hidden Title
Was this information helpful?
Let us know so we can improve!
Need more help?
Book Demo