Support Titan > Titan Web > Elements > Input > Button Group > Button Group Settings > Configure Conditions
Do you like this
feature?
If you like this feature and want to transform your business with Titan's zero code applications for Salesforce, then schedule a demo today!
Configure Conditions
Business Background
Use the Configure Conditions option to set criteria (or a list of criteria) that a user must meet to trigger an action.
How to Video
- 0:02 An introduction to Titan Flows.
- 1:57 We show you how the Flow displays.
- 2:46 Learn how to start a flow.
- 2:52 Discover the different nodes.
- 3:30 We show you how to configure conditions.
- 4:25 Learn how to set up different resulting actions.
How to Guide
- Click the + icon to open the list of elements.
- Select the Input option from the list.
- Click-and-drag an input element to the canvas.
- Any input that has the Configure Conditions button can be used.
Note:
Alternatively, you can add a condition on an On Click Action.
- Click the settings Gear icon. The Element settings screen opens.
- Select the Conditions option and click the Configure Conditions button. The Set Conditions screen opens.

- Click the Kebab icon next to Condition.
- Select the Edit option. The Edit Node screen opens.
- You can configure your conditions using every conditional field and variable available.

Note:
You can create as many conditions as needed in an action flow.
The Condition Rule Node is split into different parts:
- Then: Outline the action that occurs if the user meets the condition criteria.
- There will be a Contains Then action for every rule added that can contain an outcome.
- Else: This creates the action to be followed if the user inputs information that does not match the condition criteria.
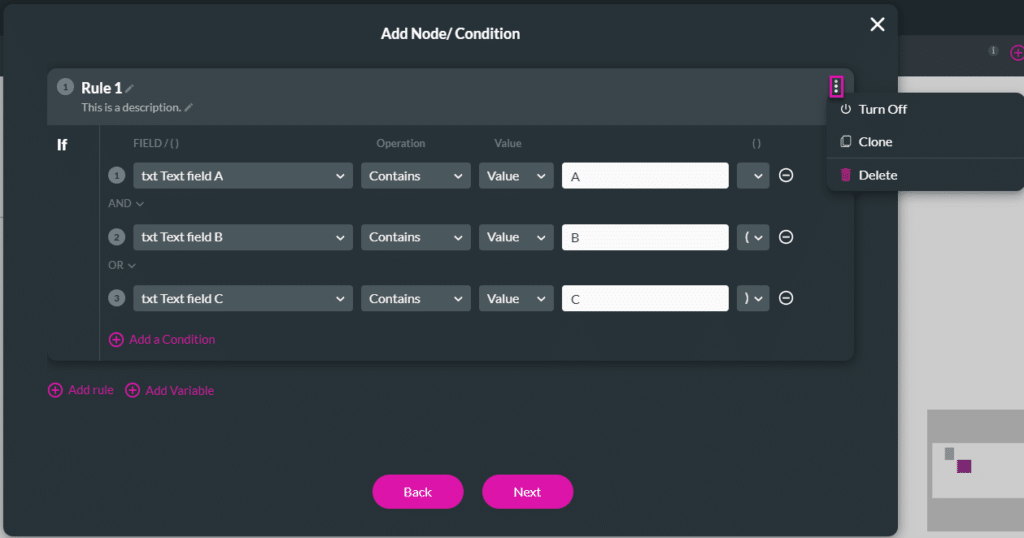
- Configure Rule 1 and click the pencil icon to edit its name and description. This will help you identify the condition’s purpose.
- Configure your rules using the drop-down arrows to create logical operations and specify the acceptable valid data to include.
- AND – Both upper and lower conditions must be met.
- OR – At least one of the upper and lower conditions must be met.
- ( ) – You must use brackets when you have a mixture of AND & OR conditions in order to determine how the conditions should be met. For example, 1 AND (2 OR 3) has a different meaning than (1 AND 2) OR 3.
Note:
Click the Kebab icon to open the modal. You can do the following:
- Turn Off the rule.
- Clone the rule. You can edit the cloned rule.
- Delete.

- Click the Next button.

- If necessary, add a tag name in the Tag field and click the Save button.
- Click the + icon. The Add Node screen opens.

- Use the Add Node screen to configure any action to run after the condition is met.

You may also be interested in:
Hidden Title
Was this information helpful?
Let us know so we can improve!
Need more help?
Book Demo

