Configure Salesforce JWT for the Platform
Business Background
Salesforce JWT (JSON Web Token) Authentication is a secure, token-based authentication method that enables Salesforce users to access resources without requiring a password. It’s commonly used in integration scenarios, especially when connecting Salesforce to other systems or apps.
It allows sharing identity and security information across different security domains. Salesforce verifies the authenticity of the JWT by checking its signature against a pre-configured certificate and other parameters. If the JWT is deemed valid and the connected app has been approved beforehand, Salesforce grants access by issuing an access token.
Titan Solution
Authenticate Salesforce JWT in Titan to integrate external applications with Salesforce and enable secure access to Salesforce resources without needing user credentials.
This feature is only available to customers with Enterprise License.
How to Guide
Open your Titan Dashboard interface and your Salesforce instance in two browser tabs. You will need to navigate between them a few times.
Do the following to configure a new connected app in Salesforce:
- Generate Public and Private Keys and a Certificate
- Titan Configuration to Authenticate Salesforce JWT
- Salesforce configuration to authenticate Salesforce JWT
- Complete Titan Configuration to Authenticate Salesforce JWT
Generate Public and Private Keys and a Certificate
For MacOS, run the following Terminal commands:
- to generate a private key:
- openssl genrsa -out privatekey.pem 2048
- to generate a public key from the private key:
- openssl rsa -in privatekey.pem -pubout -out publickey.pem
- to generate a certificate (if needed):
- openssl req -new -x509 -key privatekey.pem -out server.cert -days 365
For Windows, install Git for Windows and go to OpenSSL. Then run the following commands:
- to generate a private key:
- openssl genrsa -out privatekey.pem 2048
- to generate a public key from the private key:
- openssl rsa -in privatekey.pem -pubout -out publickey.pem
- to generate a self-signed certificate (if needed):
- openssl req -x509 -sha256 -days 365 -key privatekey.pem -in server.csr -out server.crt
- openssl req -x509 -sha256 -days 365 -key privatekey.pem -in server.csr -out server.crt
Titan Configuration to Authenticate Salesforce JWT
- Browse to the Titan Dashboard.
- Click the Settings option.
- Under Integrations, make sure that Salesforce has been authenticated.
- Click the Salesforce JWT Session Authenticate button. The Salesforce JWT Auth screen opens.

- Take note of the Callback URL. You will paste this URL into Salesforce.

Salesforce Configuration to Authenticate Salesforce JWT
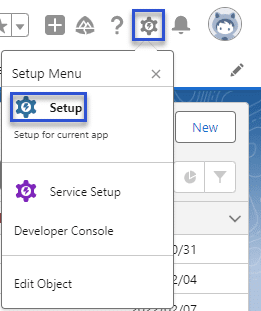
- Click the Setup icon in Salesforce and then click the Setup option on the drop-down list.

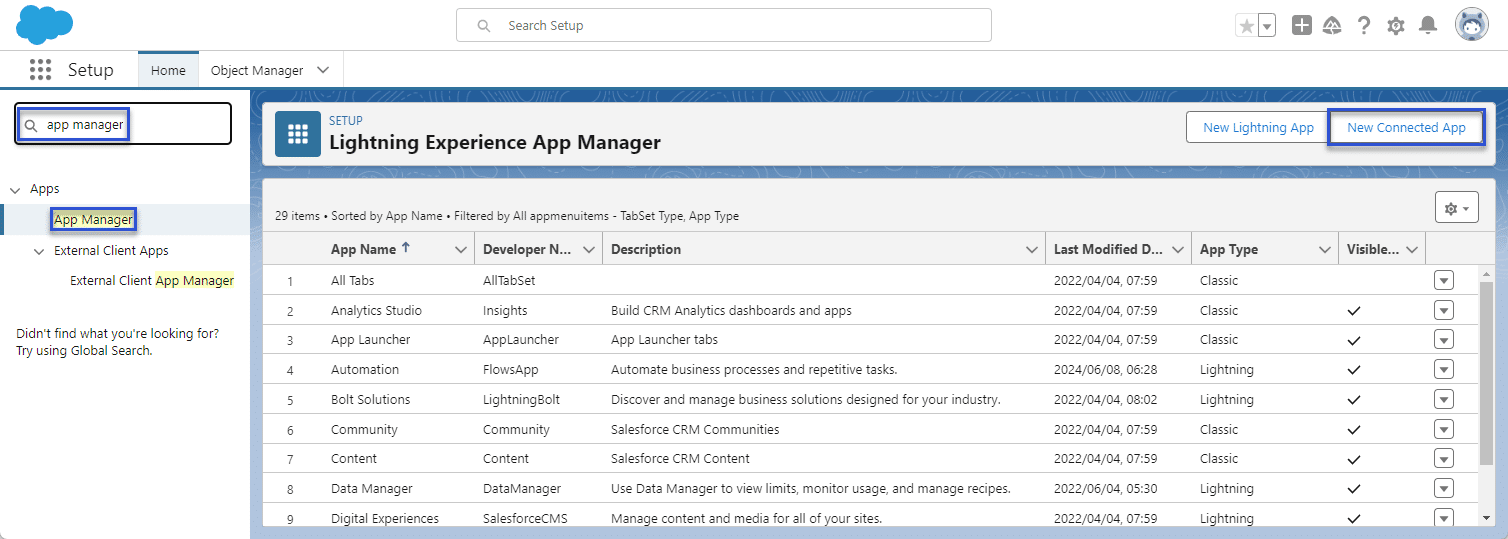
- Search for “app manager” and click the App Manager option. The Lightning Experience App Manager screen opens.
- Click the New Connected App button.

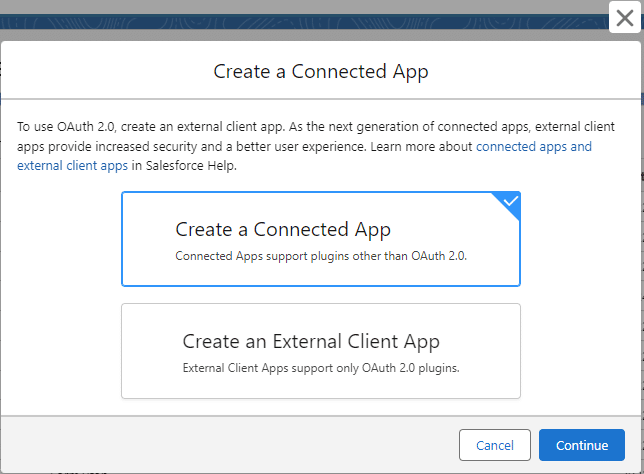
- Select the Create Connected App option and click the Continue button.
- This is the default option.

- Type the Connected App Name in the field. The API Name field is populated automatically.
- Type the Contact Email in the field.
- Click the Enable OAuth Settings checkbox.
- Paste the URL from the Salesforce JWT Auth screen into the Callback URL field.
- Click the Use digital signature checkbox and upload the certificate (server.cert file).
- Click the Choose File button.

- Select the following options from the Available OAuth Scopes list and click the Add button to move them to the Selected OAuth Scopes list.
- Full access (full)
- Perform requests at any time (refresh_token, offline_access)
- Make sure that the Require Secret for Web Server Flow checkbox is enabled.
- Click the Save button.

- Click the Continue button. The Manage Connected Apps form opens.

- Click the Manage button.

- Click the Edit Policies button.

- Use the Permitted Users drop-down list to select the Admin approved users are pre-authorized option.
- Click the OK button on the popup screen.
- Click the Save button on the form.

- Scroll down and click the Manage Profiles button. The Application Profile Assignment form opens.

- Scroll down the list and click the required checkboxes, for instance:
- Gold Partner
- System Administrator
Any user with theses profiles are pre-authorized and can get the JWT token.
- Click the Save button.

Complete Titan Configuration to Authenticate Salesforce JWT
To complete the authentication, enable the Use for Salesforce Integration checkbox on the Salesforce JWT Auth screen and fill in the fields.

- In Salesforce, search for “apps” and find the JWT app on the Lightning Experience App Manager page.
- Use the drop-down list on the right of the screen and select the View option. The Manage Connected Apps form opens.

- Click the Manage Consumer Details button. A new webpage opens, where you must paste the verification code that was sent to your email address.

- Click the Copy button to copy the Customer Key.

- Browse to the Titan page and paste the customer key on the Salesforce JWT Auth screen.
- Type the username in the field.

- In Salesforce, search for “communities” and click on the All Communities option.
- On the Communities screen, copy the URL from the screen.

- In Titan, paste the Community URL in the Audience field.
- If your Titan account is connected to a production Salesforce environment, paste this URL: https://login.salesforce.com.
- To connect to the Salesforce sandbox, use https://test.salesforce.com.

- Paste your private key in the field.
- Click the Apply button.

Salesforce JWT has been authenticated.


