

Table/Section in Word template from Web Project
Business Background
Import multiple records into your Word document in a section or table format. The data imported into the Word document is pulled from multiple repeated strips in your Web projects.
Titan Solution
- Titan grants users access to insert fields that are not required to be saved in Salesforce as a record.
- Titan provides the option to bring repeated web data to a table and section in an easy-to-read format.
How to Video
Video Coming Soon!
How to Guide
You can import multiple records into your Word document as follows:
Note:
Ensure you have installed and signed in to the Titan Word add-in.
Insert/Edit a Section
- Select the Insert/Edit Section option. The Choose provider screen opens.
- Choose the provider you wish to use.
- Salesforce.
- The data has to be in Salesforce.
- Titan Web project
- The document generation is run from an online Web project.
- Titan Submissions
- The data from the Web project is saved to Submissions, and then the document is generated. This also lets you generate the document after the Web form was completed.
- Salesforce.

- Select the Web project option.

- Select the Next button. The Insert Section screen opens.
- Configure the following mandatory fields:
- Project: This is the Titan Project the content will be pulled from.
- Comment: Add a comment description. This will assist with re-use purposes.
- Page: Select the project page to pull content from.
- Repeat Strip: Select which project strip to pull content from. Label each strip in your Titan project for easy identification.
- After the configuration is completed, select the Insert button.

The section is added to your Word document.

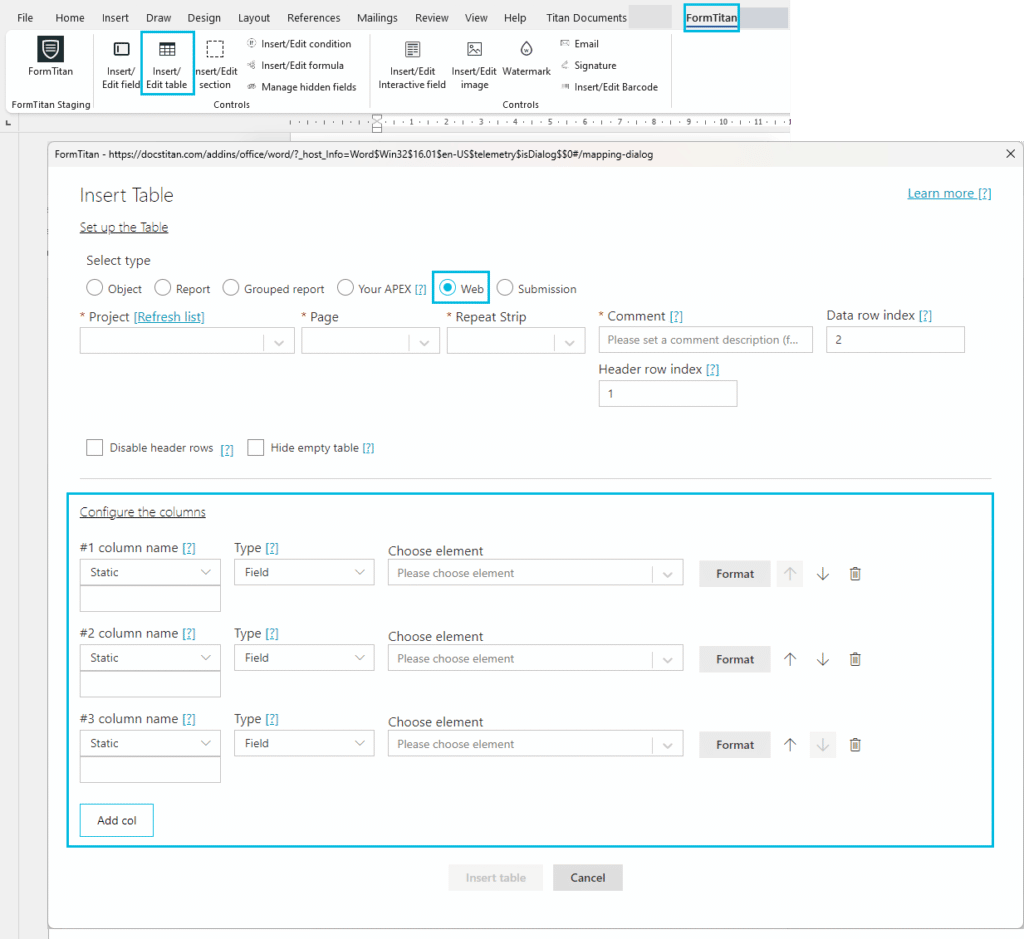
Insert/Edit a Table
- Select the Insert/Edit Table option. The Insert Table Screen opens.
- Set up the table:
- Select the Web radio button.
- Configure the following mandatory fields:
- Project: This is the Titan Project the content will be pulled from.
- Page: Select the project page to pull content from.
- Repeat Strip: Select which project strip to pull content from. Labeling each strip in your Titan project for easy identification.
- Comment: Add a comment description. This will assist with re-use purposes.
- Configure the following fields if necessary:
- Data row index
- Header row index

- Set up the columns:
- Use the drop-down lists to configure at least three columns:
- Column name
- Static: Type a column name in the field.
- Dynamic: Use the drop-down list to selecta field
- Type
- Choose element
- Column name
- Use the Add col button to add more columns and configure as above.
- Use the drop-down lists to configure at least three columns:
- Select the Insert table button.
The table displays in your Word document.

Hidden Title
Was this information helpful?
Let us know so we can improve!
Need more help?
Book Demo