

PayPlus Payments
Business Background
Do you want to add payment types to your Web project? Now, you can add PayPlus as one of the payment options to configure payments into your platform or marketplace and integrate the payment with your Salesforce.
PayPlus offers a versatile payment gateway supporting various payment methods, including credit/debit cards (Visa, Mastercard, American Express), digital wallets (Alipay, WeChat Pay), and bank transfers. The platform caters to both online and in-person transactions, providing solutions for diverse business needs. It provides security measures, such as PCI DSS compliance, 3D Secure authentication (Mastercard SecureCode and Verified by Visa), and advanced fraud detection systems. These features ensure secure processing of transactions and protection of sensitive customer data.
Titan Solution
Add PayPlus as a payment option on your website to enhance the user experience. You can seamlessly integrate PayPlus payments with your Salesforce account.
You can add the following:
- Different currencies
- Single payments or installments
You can configure different actions on payment:
- Send an email
- Redirect the user to another internal or external page
- Push payment data to Salesforce
How to Guide
Prerequisites:
- Select the PayPlus option. The Payment Configuration screen opens.

- Set up the following:
Payment Method
- Use the drop-down list to select a currency. This is a list of the currencies that PayPlus supports. The options are:
- Dollars
- Euros
- CHF Francs
- Australian Dollars
- Canadian Dollars
- Israeli Shekel
- Pound Sterling
- New Zealand Dollars
- Dynamic
You can select “Dynamic” to provide a flexible currency, according to the customer’s needs.

The dynamic value must have been added as a variable. The string must be as follows, for instance:
- USD
- EUR
- CHF
- ILS
PayPlus will reject any other values. Please refer to the API for the string values for currencies.
- Use a radio button to select the following:
- Single payment. Only a single payment will be deducted.
- Recurring payment. A recurring payment is an automatic payment charged to a customer’s credit/debit card each time the payment is due until the customer notifies the vendor. Merchants must first get permission from the consumer; for instance, for membership fees
- Recurring payments are configured on the Processor Configuration screen.
- Installment payment. The money due will be deducted as one of several equal payments spread over an agreed period of time.

- Select the Next button. The Payment Configuration > Processor Configuration screen opens.
Processor Configuration
Configure the following as necessary:
- Required processor configuration
- Recurring Settings (if “Recurring” was selected on the Payment Method screen)
- Structured Parameters
- Custom Parameters
- Items
- Customer
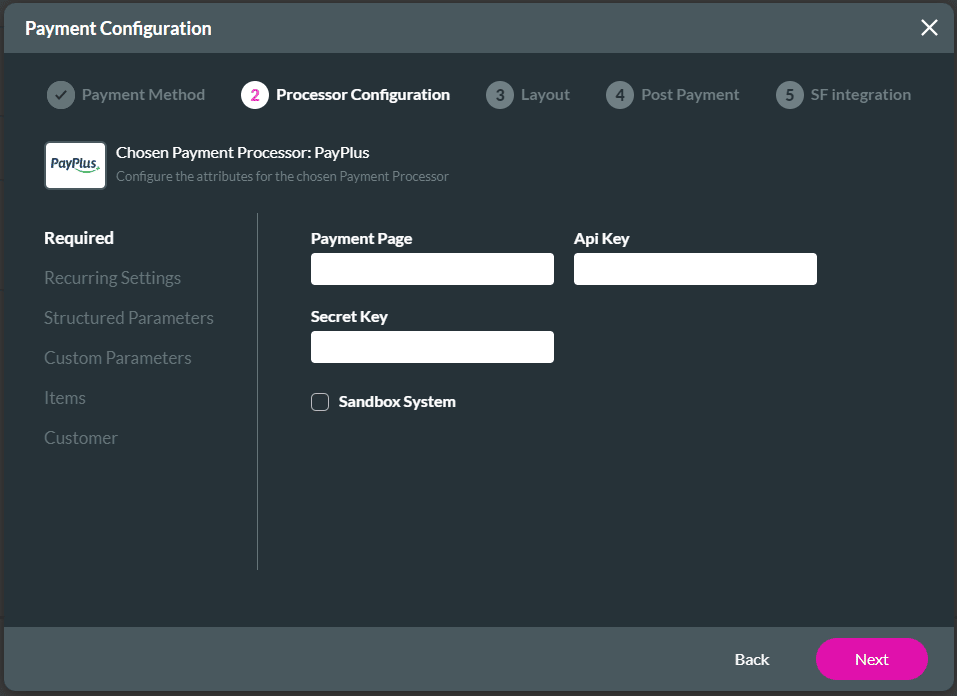
Required
- For Required processor configuration, do the following:
- Add the Payment Page to the field. This is the page where the user adds their purchase. For instance, Google Pay™ is fully integrated into the securely hosted payment pages of PayPlus.
- Add the API Key.
- Add the Secret Key. This key is used to verify that PayPlus sent the data.
- If necessary, select the Sandbox System option. The Sandbox System is an isolated virtual machine in which potentially unsafe software code can execute without affecting network resources or local applications. This is a safe way to test the payment integration.
Recurring Settings
- Select the Recurring Setting option.
- Use the toggle switch to enable the recurring settings.
- Use the Field or Static options to add parameters.
- Use the drop-down list to select a Field parameter.
- Type a Static parameter in the field.
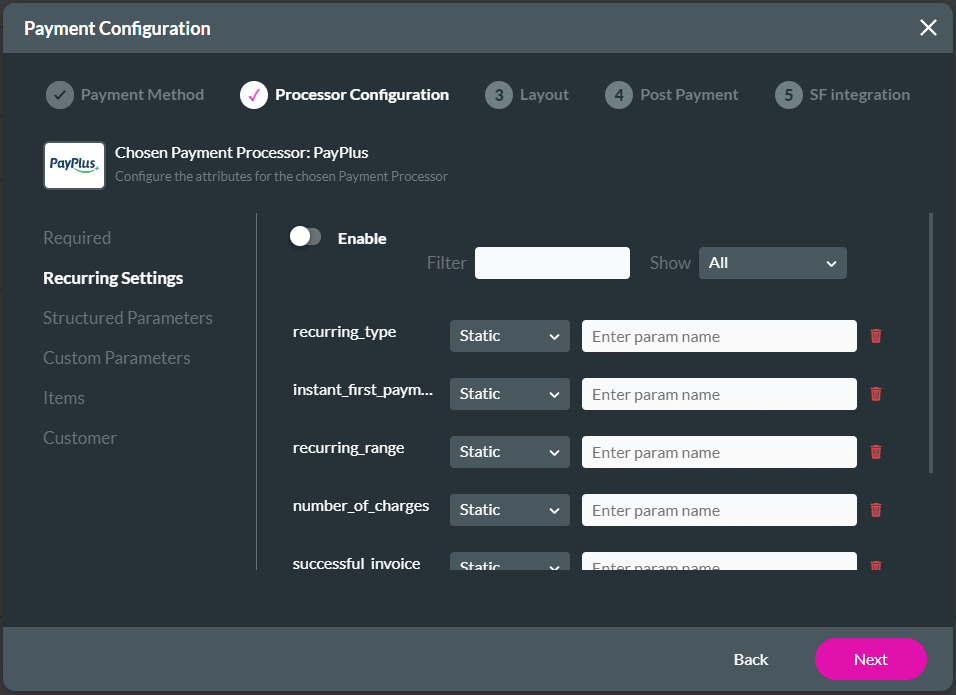
| Attribute | Type | Description |
|---|---|---|
| recurring_type | number | 0 – daily, 1- weekly, 2- monthly |
| instant_first_payment | number | The initial first payment will be immediately. |
| recurring_range | number | The range is 1 if the payment must run every month, 2 if the payment must run every second month, etc. |
| number_of_charges | number | The number of charges in the recurring payment. It is a number from 0 to unlimited. |
| successful_invoice | boolean | In case the invoice company is integrated, this is the initial invoice for every successful payment. |
| start_date | number | The date that the recurring payment will be started. This must be a number from 1 to 28. |
| end_date | string | The date that the recurring payment will stop in the format 2028-01-16. |
Also, refer to the API – Generate Payment Link for more information on the recurring payment attributes.
Structured Parameters
- Select the Structured Parameters option.
- Use the toggle switch to enable the structured parameters.
- Use the Field or Static options to map the language code. It will transfer the language code that is displayed on your page. It will take the general setting of the page by default.
- Use the drop-down list to select a Field parameter.
- Type a Static parameter in the field.

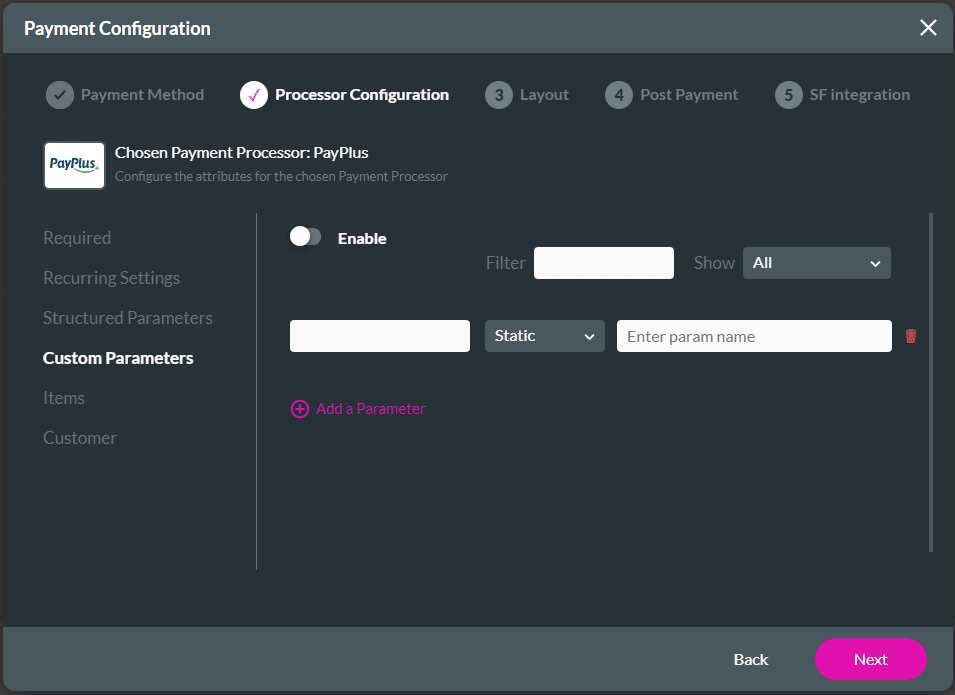
Custom Parameters
- Select the Custom Parameters option.
- Use the toggle switch to enable the custom parameters.
- Use the Field or Static options to add custom parameters.
- Use the drop-down list to select a Field parameter.
- Type a Static parameter in the field.
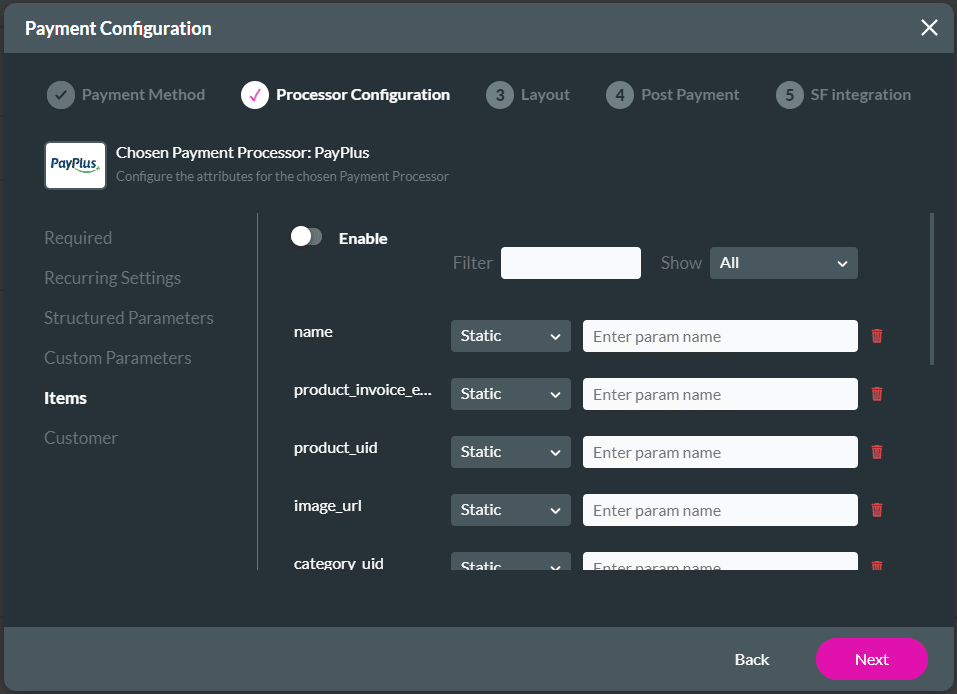
Items
- Select the Items option.
- Use the toggle switch to enable the items.
- Use the Field or Static options to add items.
- Use the drop-down list to select a Field parameter.
- Type a Static parameter in the field.
Customer
- Select the Customer option.
- Use the toggle switch to enable the customer parameters.
- Use the Field or Static options to add customer information.
- Use the drop-down list to select a Field parameter.
- Type a Static parameter in the field.

- Select the Next button. The Payment Configuration > Layout screen opens.
Layout
- Add a label in the field.
- This is mandatory.
- This description will appear on the Configure Project Payments Settings screen under the My Payments list.
- Use the drop-down list to select the total amount.
- This is mandatory.
- You must have added the amount as an input element or variable on your project.
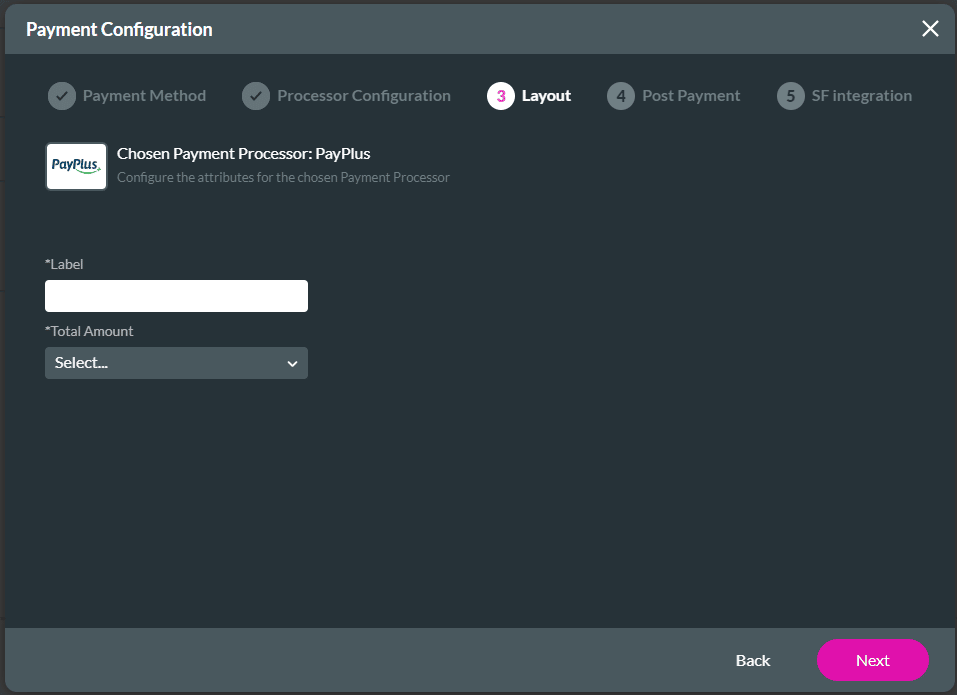
- Select the Next button. The Payment Configuration > Post Payment screen opens.
Post Payment
You can do the following:
- Send an email.
- Redirect the user to an internal and/or external link when the payment processing has finished.
- Redirect the user to an internal and/or external link when the payment processing has failed.
- To send an email, use the toggle switch to enable the option.
- You can configure an email that will be sent when the transaction has been processed.
- Select the configured email.

- Select the Redirect on Success option, if necessary
- Use the toggle switch to switch on a redirect action on success action.
- Configure an External redirection.

- Configure an Internal redirection.

- Select the Redirect on Failure option, if necessary
- Use the toggle switch to switch on a redirect action on failure action.
- Select the Next button. The Payment Configuration > SF Integration opens.